


Old-Fashioned Oklahoma Nut Candy: The Sweet, Crunchy Legend of the South
Some recipes aren’t just sweets — they’re stories. They carry the aroma of childhood kitchens, the laughter of family gatherings, and the kind of memories that only homemade candy can hold. Old-Fashioned Oklahoma Nut Candy is one of those rare treasures. Rooted in Southern tradition and passed down through generations, it represents everything people love about vintage desserts: simple ingredients, honest flavor, and a whole lot of heart.
2.
Old-Fashioned Oklahoma Nut Candy: The Sweet, Crunchy Legend of the South!
There are some recipes that don’t just make dessert—they make memories. They’re the ones handwritten on stained index cards, passed down through generations, and eagerly awaited every holiday season. Old-Fashioned Oklahoma Nut Candy is one of those legendary recipes. This isn’t just candy; it’s a slice of Southern heritage, a rich, buttery confection that’s stood the test of time for one simple reason: it’s absolutely, irresistibly delicious.
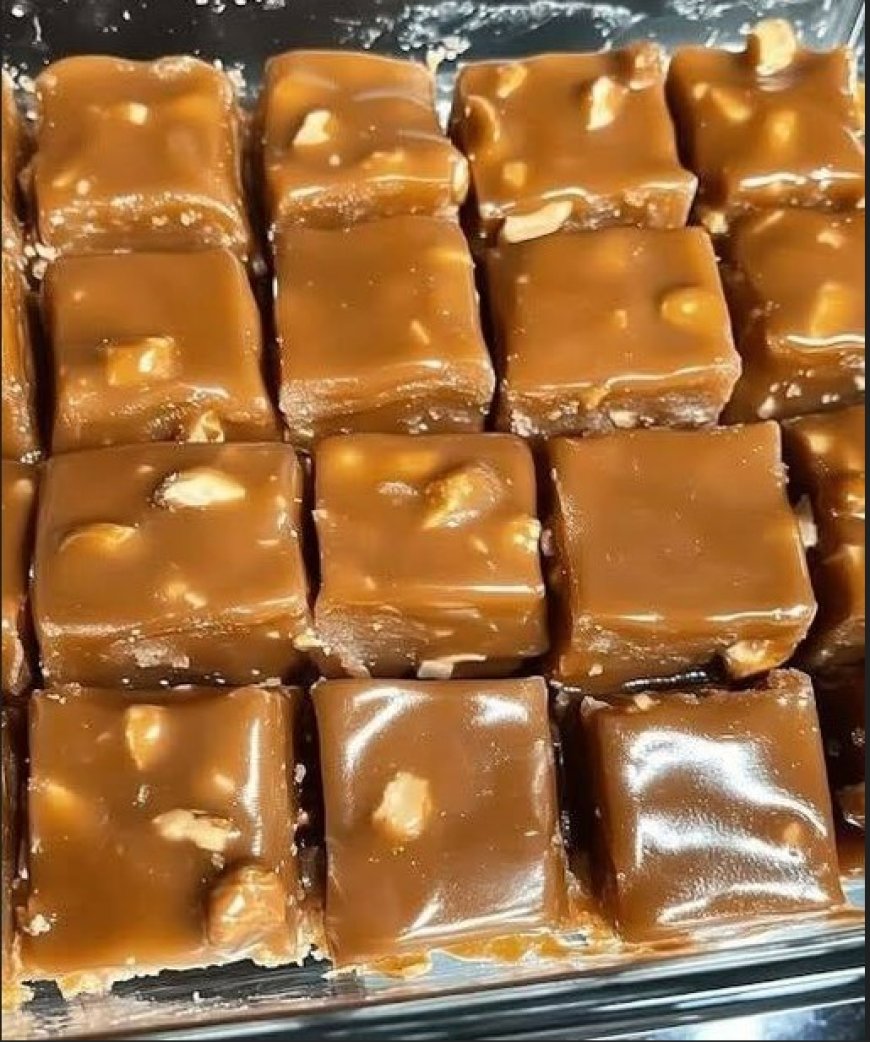
Imagine a candy that’s simultaneously crisp and tender, with a deep, caramelized sweetness that’s perfectly balanced by the salty, toasty crunch of pecans. Each piece melts on your tongue, releasing waves of brown sugar and butter, while the nuts provide a satisfying texture that makes it impossible to stop at just one piece. It’s the kind of treat that inspires quiet reverence—followed by a mad dash for the recipe.
Whether you’re continuing a family tradition or starting a new one, this classic is your ticket to becoming a holiday hero. Let’s make some magic!
Why This Vintage Candy Recipe is Timeless
Before we gather our simple ingredients, let’s talk about what makes this candy so special:
FLAVOR THAT POPS: The combination of brown sugar, butter, and toasted nuts creates a complex, caramel-like flavor that’s far superior to any store-bought candy.
SIMPLE & FOOLPROOF: With no candy thermometer required and just one pan, this is an approachable classic that even beginner candy-makers can master.
THE ULTIMATE GIFT: Beautifully wrapped in a cellophane bag or festive tin, this candy is a heartfelt, homemade gift that says “you’re special” far better than anything from a mall.
Your Simple, Old-Fashioned Ingredient List
The beauty of this recipe is in its purity—just a few high-quality ingredients create pure magic.
The Candy Base
1 cup (2 sticks) high-quality unsalted butter
1 cup packed light brown sugar
1 cup granulated sugar
⅓ cup whole milk or evaporated milk for extra richness
1 teaspoon pure vanilla extract
The Star of the Show:
2 cups raw pecans, roughly chopped
Optional: ½ teaspoon flaky sea salt for sprinkling on top
No Special
Equipment Needed!
A heavy-bottomed saucepan (to prevent burning)
A wooden spoon or heatproof spatula
A baking sheet lined with parchment paper or a silicone mat
Your Foolproof Guide to Candy-Making Success:
Follow these steps for perfect, old-fashioned candy every single time.
Step 1: Prep Your Pan & Toast Your Nuts
Line a standard baking sheet (around 13×18 inches) with parchment paper or a silicone baking mat. Spread the chopped pecans in a single layer. Toast them in a preheated 350°F (175°C) oven for 6-8 minutes until fragrant. Watch closely—they burn easily! This step is non-negotiable for unlocking their deepest, richest flavor
Step 2: The Simmering Magic
In a heavy-bottomed saucepan (at least 3-quart capacity), combine the butter, brown sugar, granulated sugar, and milk. Cook over medium heat, stirring constantly with a wooden spoon, until the butter melts and the sugars dissolve.
Step 3: The Boil That Makes the Candy
Bring the mixture to a rolling boil. Once boiling, set a timer and let it boil for exactly 4 minutes, stirring continuously. The mixture will bubble vigorously and thicken slightly. This is when the magical candy structure forms
Step 4: The Grand Finale
After 4 minutes, immediately remove the pan from the heat. Quickly stir in the vanilla extract and all of the toasted pecans. Keep stirring until the mixture is well combined and begins to thicken and lose its gloss—this should take about 1-2 minutes.
Step 5: Spread and Score:
Working quickly, pour the candy onto your prepared baking sheet. Use a heatproof spatula to spread it into an even layer about ¼ to ½-inch thick.
Pro Tip: While the candy is still warm, use a sharp knife to lightly score it into squares or rectangles. This will make it much easier to break into perfect pieces once it’s fully cooled and hardened.
Step 6: The Patient Wait:
Let the candy cool completely at room temperature until it’s firm and crisp. Do not refrigerate, as this can cause the candy to become sticky. This will take 1-2 hours
Pro-Tips from a Southern Kitchen
DON’T WALK AWAY: Candy-making requires your full attention. Stay by the stove and stir Tap the p.hoto to v.iew the full r.ecipe.